How to Automatically Renew LetsEncrypt Certificates and Restart Your Web Server

Edit your crontab by typing crontab -e and then add the following line.

0 6 * * * certbot renew --post-hook "systemctl restart lsws"

In my example, I am restarting Litespeed, but you could restart Nginx or Apache by changing it like this:

0 6 * * * certbot renew --post-hook "systemctl restart nginx"
0 6 * * * certbot renew --post-hook "systemctl restart apache2"

This will check your certificates every day at 06:00 and renew it if necessary. Once it’s renewed, it will restart your web server so that the new certificate takes effect.
Posted in Linux | Leave a comment

How to Create an Admin User With All Privileges on MariaDB / MySQL

First, login to the server as root.

mysql -u root

If your MySQL / MariaDB installation is not set up to allow you in without a password, add the -p flag.

mysql -u root -p

This will prompt you for your root password. Once you’re in, run this after replacing the variables with your preferred values:

CREATE USER 'admin'@'localhost' IDENTIFIED BY 'some_pass';
GRANT ALL PRIVILEGES ON *.* TO 'admin'@'localhost' WITH GRANT OPTION;
FLUSH PRIVILEGES;

If you want to allow remote connections, use this instead. Keep in mind that this is less secure.

CREATE USER 'admin'@'%' IDENTIFIED BY 'some_pass';
GRANT ALL PRIVILEGES ON *.* TO 'admin'@'%' WITH GRANT OPTION;
FLUSH PRIVILEGES;

Posted in MySQL / MariaDB | Leave a comment

How to Obtain a Let’s Encrypt SSL Certificate Using the WebRoot Plugin

Once you’ve installed certbot, run the following command after replacing the relevant variables with your information.

sudo certbot certonly --webroot --agree-tos --email your-email address -d your-domain.com -w /var/www/your-domain.com/

Here’s what we’re doing:

  • certonly tells certbot to obtain the cert only, don’t install it.
  • –webroot option specifies the webroot plugin is being used.
  • –agree-tos means agree Let’s Encrypt’s terms of service.
  • email address is used to receive expiry notice from Let’s Encrypt and can also be used to recover lost key.
  • -d option specifies the domain name.
  • -w option specifies the web root path.
Posted in FAQ, Linux | Leave a comment

List all IPs connected to your server along with connection count

Here’s how you can find out which IPs are connected to your Linux server, and how many times each IP is connected:

Group by IP:

netstat -ntu | awk ' $5 ~ /^[0-9]/ {print $5}' | cut -d: -f1 | sort | uniq -c | sort -n

Group by IP (but Handle IPv6):

netstat -ntu | awk ' $5 ~ /^(::ffff:|[0-9|])/ { gsub("::ffff:","",$5); print $5}' | cut -d: -f1 | sort | uniq -c | sort -nr

Group by IP and Port:

netstat -nt | awk -F":" '{print $2}' | sort | uniq -c

Posted in Linux | Leave a comment

How to restore network / internet access after replacing your NIC or Motherboard in Linux

When changing your network card or motherboard, your Mac address will change and this will cause your config to become incorrect.

I recently had this problem after the motherboard of my server failed and I have to replace it. This is how I resolved the issue:

Step 1. Make a copy of and delete /etc/udev/rules.d/70-persistant-net.rules
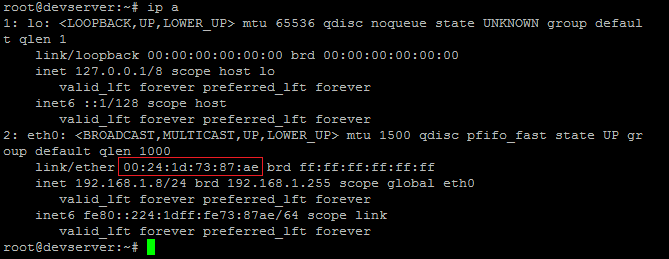
Step 2. Run ip a to find your new device’s mac address.
mac-address
Step 3. Edit /etc/sysconfig/network-scripts/ifcfg-eth0 and add the mac address from step to into the HWADDR value. (Note: This assumes your NIC is eth0, please adjust as necessary.)
Step 4. Reboot

Posted in FAQ, Linux | Tagged , | Leave a comment

How to set a static IP address in Linux via command line

To set a static IP address in Linux, simple edit /etc/network/interfaces and change your interface settings using the example below:

In this example, I’m setting my IP address to 192.168.1.100.

# The primary network interface
auto eth0
iface eth0 inet static
  address 192.168.1.100
  netmask 255.255.255.0
  network 192.168.1.0
  broadcast 192.168.1.255
  gateway 192.168.1.1

If you’re using Ubuntu and you want to set static nameservers, see this article: The Correct Way to Set Nameservers in Ubuntu 12.04 and up

Posted in Linux | Tagged | Leave a comment

The Correct Way to Set Nameservers in Ubuntu 12.04 and up

If you’ve specified nameservers in resolv.conf on Ubuntu 12.04+, you’d probably find that rebooting would erase the nameserver information that you entered. If you edit the resolv.conf you will see the following message:

# Dynamic resolv.conf(5) file for glibc resolver(3) generated by resolvconf(8)
# DO NOT EDIT THIS FILE BY HAND -- YOUR CHANGES WILL BE OVERWRITTEN

How to correctly set nameservers:

Instead of using resolv.conf, edit /etc/network/interfaces and add the line dns-nameservers nameserver ip, second nameserver ip.

Here’s an example:

# The primary network interface
auto eth0
iface eth0 inet static
  address 192.168.1.100
  netmask 255.255.255.0
  network 192.168.1.0
  broadcast 192.168.1.255
  gateway 192.168.1.1
  dns-nameservers 192.168.1.1 8.8.8.8

Posted in Ubuntu | Tagged , | Leave a comment

Recursively CHMOD Only Files or Directories via Command Line

Using the commands below, you can recursively chmod a large number of files or directories.

Directories
find . -type d -exec chmod 755 {} \;

Files
find . -type f -exec chmod 644 {} \;

Important:
Remember to the command in the directory that you wish to recursively chmod.

Please use the above commands with care as it can potentially change an infinite number of files in one go.

Posted in FAQ | Tagged , , , | Leave a comment

How to Shutdown or Reboot Windows in a Remote Desktop Session

Restarting Windows during a Remote Desktop Session can prove to be way more difficult than it should since there the obvious methods are missing during a RDP session.

To shut down a remote computer when you are using Remote Desktop, press CTRL+ALT+END, and then choose whether you want to shutdown or reboot by using the red power icon in the bottom right corner.

Posted in Windows 7 | Tagged , , , | Leave a comment

Yum Update: How to temporarily or permanently exclude certain packages

This tutorial is useful if you’ve found yourself in a scenario where you want to run yum update, but you want to hold back certain packages.

Temporarily Excluding Certain Packages:

To temporarily hold back a package when running yum update via the command line:

Run yum update with the exclude option. For example, to prevent Yum from updating the kernel, use the command like this:

yum –exclude=kernel* update

To prevent Yum from updating PHP, you would use this command:

yum --exclude=php* update

To exclude multiple packages, run the command like this:

yum --exclude=php* –-exclude=kernel* update

Permanently Excluding Certain Packages:

Edit /etc/yum.conf

Append the following line containing your packages under [main] section:

exclude=php* kernel*

Posted in Centos | Tagged , , | Leave a comment